
One thing I never really appreciated before I began my Etsy shop was just how much I would learn and about how many things. Marketing, pricing, photography--all things that are very, very essential to an online business and all things about which I was relatively ignorant. Through a lot of forum reading and trial and error my pictures have come a LONG way, but they are still far from perfect. So, based on what I have learned in the past year or so, here are my tips for better photos:
1. Lighting Great lighting makes all the difference in the world. Natural light is wonderful but often hard to come by (especially if you are a night owl!). Instead I created this nifty lightbox based on this article.
 Tips for lightboxes:
*Always use a bigger box than you think you need, you never know when your product line might expand or the perfect prop makes it a tight fit. If nothing else, leave enough room for you to comfortably shoot your pictures (meaning room for your hands to get it and enough height that you can see the preview screen on the back of your camera. I built my first one out of what I thought was a good sized box. After we moved, I pressed one of the bigger boxes into service as my new lightbox.
*Play around with different light bulbs/lamps and positionings. I have found that the photos I take with just my lightbox are darkish, BUT if I take the photos in my lightbox with the window open, they are gorgeous. Apparently, the overhead light in my craft room does not provide enough ambient light.
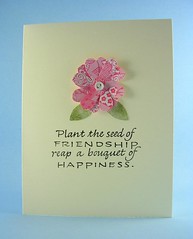
2. Backgrounds There are several methods to selecting backgrounds, but what works best for you depends (not surprisingly) on your product. My cards feature a single bright colored flower against ivory card stock. This means that colored backgrounds are not my friend unless I constantly change them to best match the flower color. (Otherwise, the flowers can look sickly or the ivory cardstock starts to pick up the background color). And frankly, that is just too much work for me to keep up with.
 Instead, I try to find fairly neutral (I've found dark brown works really well for my cards) backgrounds that photograph well (many posterboards change colors or have a glare when photographed, so I switched to fabric, see left.). In a way, it becomes part of my store's "signature" that all photos are taken against the same background.
I've noticed that many metalsmiths (whose work is a neutral color) often use very bold, bright backgrounds to catch people's eye. That works incredibly well for their subject. However, many new jewelery artists try to mimic this same style for thier own pics--but if their work is, say, heavily beaded bracelets, the background color becomes a distraction and competes with their works.
Always think about your product and always take a few test photos of possible backgrounds as they often look very different on "film".
 3. Composition Despite that fact that we consider composition when creating our work, many people forget to pay attention to this when taking pictures. Even just taking a picture at an angle can turn a boring, everyday pictures, into a breathtaking, and eye-catching one.
4. Cropping Cropping your photos has a couple main advantages. First, it allows your photos to appear more uniform. I crop all my pictures so that my cards have approximately the same amount of background all the way around them. These leads to a more regular feel to my shop. Secondly, cropping your photos allows you to take your pictures from a distance but still get a nice, tight shot for your shop.
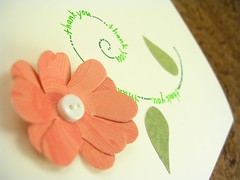
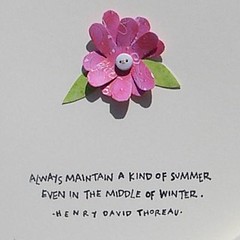
Cropping can also allow you to create a more interesting thumbnail. White space with a fleck of color is not enticing, but a large, interesting shot will make me click--even if I can't tell what it is. Jewelry makers especially can benefit from close up shots of beads or color to make their jewelry *pop* off the page. I used to think it was some sort of cardinal sin to cut off part of my main image. Then I realized how much more *interesting* the picture could be. The images below show two thumbnails for the same style of card. Which one would you be more likely to click on?
You don't need any sort of fancy software to do this. I do mine in MS Paint, which has got to be the cheesiest "graphics" program ever. If you run Windows, you have Paint, check under All Programs-->Accessories from your Start Menu.
5. Glare If you have ever tried to photograph buttons, magnets, glossy paintings, or just about anything but flat paper, you have struggled with this. My trick? Find various things to prop the item up against--even if they are just barely off the table. This gives the item a slight angle, which you can match with your camera, and causes the light to hit it differently.
 6. Close Ups The key to good close-up pictures is the Macro setting on your camera. Most digital cameras have one--just look for the picture of the flower. When using the macro setting, get very close to your subject and wait for the image to steady in the frame (the camera has to decide which part is close and which part is far) before clicking. Remember to turn the Macro setting off when you move back to regular shots.
7. Exposure One of the most frustrating things I dealt with was building my brand new shiny lightbox and still having "gray" pictures. What was I doing wrong? I wasn't reading my camera's manual for one. : ) Exposure is somewhere in your camera's settings and ranges from .3 to 2.0, with .3 being the dullest and 2.0 the brightest. Essentially, this setting controls how hard the camera looks for light. If you are in a very bright environment, you want to ratchet it down. If you are in a dimly lit one, you want to go up.
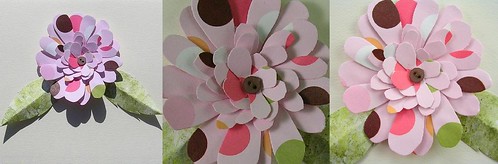
This image shows a range of images taken one after the other, with different exposure settings. See the difference?

This should be adjusted whenever you notice that your images are looking a little grayed out.
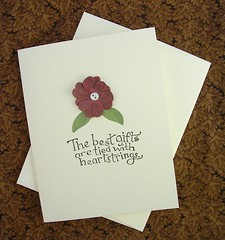
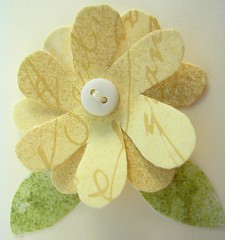
 8. White balance Another common issue is having great pics--withyellowy or bluey whites. (The pic to the right shows a wonderful picture taken down several notches by a yellowy tinge to the card.) To correct this you can have your digitalcamera calibrate itself. On my camera, (A Nikon Cool Pix), I go to white balance and there is a place to have it measure. I hold the camera so that a small square is centered on something I know to be white (I keep printer paper handy for this). The camera snaps a picture and then scales until that box is pure white. It will then use this adjustment when taking pictures.
The important thing to remember about this is that is really needs to be set everytime you take pics. Lighting conditions change from day to day, so the calibration that worked yesterday isn't necessarily going to be the same one needed today. And nothing is more disappointing than spending several hours taking pics only to discover that they are ALL yellow. Ugh.
GREAT suggestions - thanks so much for sharing! *runs off to try out more picture settings*
ReplyDeleteExcellent advice. :)
ReplyDeleteGreat post. Very detailed, but easy to follow! And, better late than never. :)
ReplyDeleteThanks for the simple tutorial- I did not realize the exposure setting was the problem with lots of my pictures
ReplyDelete